This is an updated guide to get both visible and thermal camera image overlay working on a Raspberry Pi running the new Raspbian Jessie with Pixel OS using our custom pylepton library for the FLIR Lepton. Pixel greatly simplifies setup time over previous methods.
Directory
P1 —Download Required Software
P2 — Connect the Pure Breakout board to the Raspberry Pi
P3 — Software Installation
Required Parts
- 1x Raspberry Pi 3 (it will also work on the Pi 2)
- 1x MicroSD Card 8GB or larger. This is what we use here: SanDisk Ultra 32GB microSDHC Card
- 1x FLIR Lepton Thermal Imager
- 1x FLIR Lepton Breakout Board
- 8x Female to Female jumper wires
- 1x Keyboard and Mouse
- 1x Micro USB cable and wall adaptor
- 1x Monitor with HDMI port or HDMI to DVI converter
- 1x HDMI cable
- 1x Ethernet cable
- 1x Raspberry PI 5MP Camera Board Module v2
P1 —Download Required Software
1 — Follow this link and download "RASPBIAN JESSIE WITH PIXEL"
2 —Once downloaded insert your micro SD card into your computer, then follow one of the guides on this page to write the Raspbian Image to your micro SD card.
3 — When the image file has been written to the micro SD card, insert the card into your Raspberry Pi

P2 — Connect the Pure Breakout board to the Raspberry Pi
1 — Match your female to female jumpers wires to the images below (note: your jumper wires may differ in color). You can also use the list below.
- CS -> Pin 24, CE0
- MOSI -> Pin 19, MOSI
- MISO -> Pin 21, MISO
- CLK -> Pin 23, CLK
- GND -> Pin 6, GND
- VIN -> Pin 1, 3V3
- SDA -> Pin 3, SDA
- SCL -> Pin 5, SCL


2 — Once you have attached the breakout board, connect your monitor, keyboard, mouse, ethernet cable, and finally the micro USB cable to power the board.

3 — Now install the Raspberry Pi Camera, the camera should face towards the IO ports.

P3 — Software Installation
1 —Once you get to the Pixel desktop, open terminal


2 — Next install python-open cv: sudo apt-get install python-opencv


3 — Next download pylepton from github: git clone https://github.com/kekiefer/pylepton.git

4 — Then cd to the newly downloaded pylepton folder: cd pylepton

5 — Now install pylepton software: sudo python setup.py install

6 — Next it is time to change some of the raspberry pi settings, type the following to get to this menu: sudo raspi-config

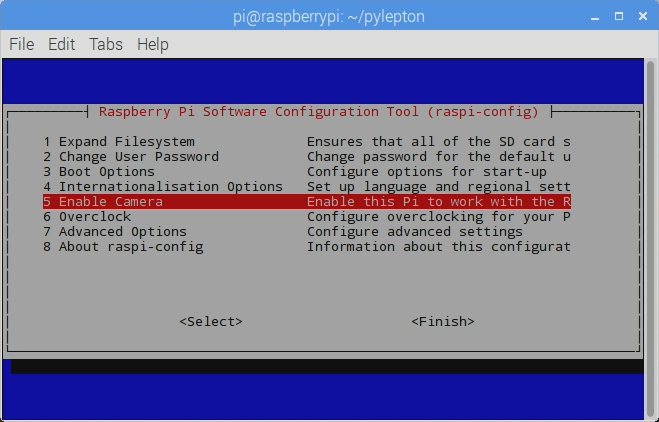
7 — First enable the camera.

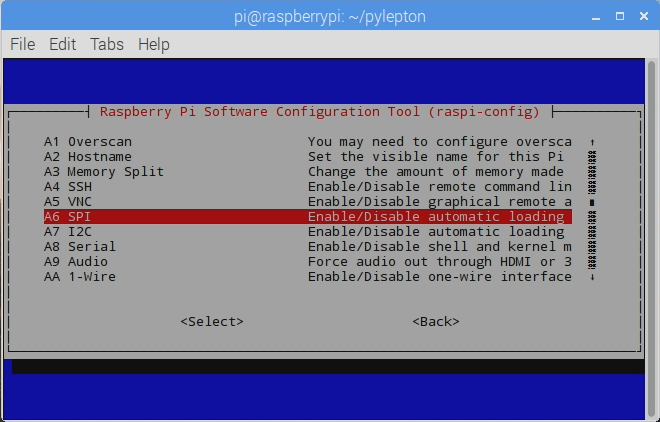
8 — Now go to Advanced Options.

9 — Then enable SPI.

10 — Return to the Advanced Options menu.
11 — Now enable i2c.


12 — Now we need to exit raspi-config and reboot.


13 — Once the raspberry pi has rebooted and returned to the desktop, open terminal again. Then type the following to test out the pylepton_overlay software: pylepton_overlay -a 155

14 — Congratulations, you should now see a thermal overlay image on the screen. To close this window press ctrl+c . Now it's up to you to use pyLepton to create your own interesting Lepton applications on Raspberry Pi. Definitely let us know what you make!
